
How Can I Improve My Email Delivery Rates?

We often get asked, “My email never got to the recipient or it ended up in their Junk/SPAM, how can I fix that?”
There are some MUST and some nice-to-have modifications you need to make to your organization and mail client (Outlook) to give your email the best chance of getting to your Inbox.
Your first step should be to look at Mail Log and Mail Error Log guide. These facilities will show you the actual error (or acceptance/message tracking you can provide to the recipient to determine the issue).
Must Haves
———-
The following features are required if you intend to send an email
on the Internet in 2023 and beyond:
1. SPF Record
You should deploy a restrictive SPF record that only includes organizations you send mail from. Make sure it ends in -all. This prevents spoofing.
2. DKIM Record
You should deploy a DKIM record, this indicates the message went through the appropriate network and has not been tampered with.
3. DMARC Record
You should deploy a DMARC record and review any rejections/problems. This is “a canary in the coal mine” that will alert you when there is an issue.
4. No External Forwards
You need to disable/remove external mail forwarding (user@ your domain forwarding mail to someone@gmail.com) and close any open relays/issues and any autoresponders/bouncers.
Nice to have
————
The following features are nice to have and will help you improve delivery.
This is a lot for smaller providers but it’s something we offer to our managed clients.
1. Separate marketing domain
DO NOT use your domain at Constant Contact, Mailchimp, etc, and also with your M365/Gmail services. Most email security providers will identify and treat the entire domain as bulk mail. Create a separate marketing/alerting domain if you send automated emails.
2. Simplify your email
Remove disclaimers, signature pictures, tracking pixels, and signature providers – if your email looks like a website it’s going to Junk. This is the least popular suggestion but if you want your email to get there drop the links and pictures.
3. Trim the thread
When replying or forwarding, delete all but the last part of the message. Each image, icon, and embedded element in the message increases the count and the likelihood that your message is SPAM.
4. No large pictures
All email security solutions look at the % of the message that is image vs. text. If you send a oneliner with a large image, it might end up in junk.
Lastly, simply ask your frequent contacts to add you to their allowed/trusted senders. This helps bypass any errors or problems with email security (which do happen!) on the receiving side but it does take some effort. When we sign up someone new they get a separate plain-text email asking them to either add the sender to allow list or forward the request to their admin (allow 174.136.31.16/28 and 207.210.228.192/28)
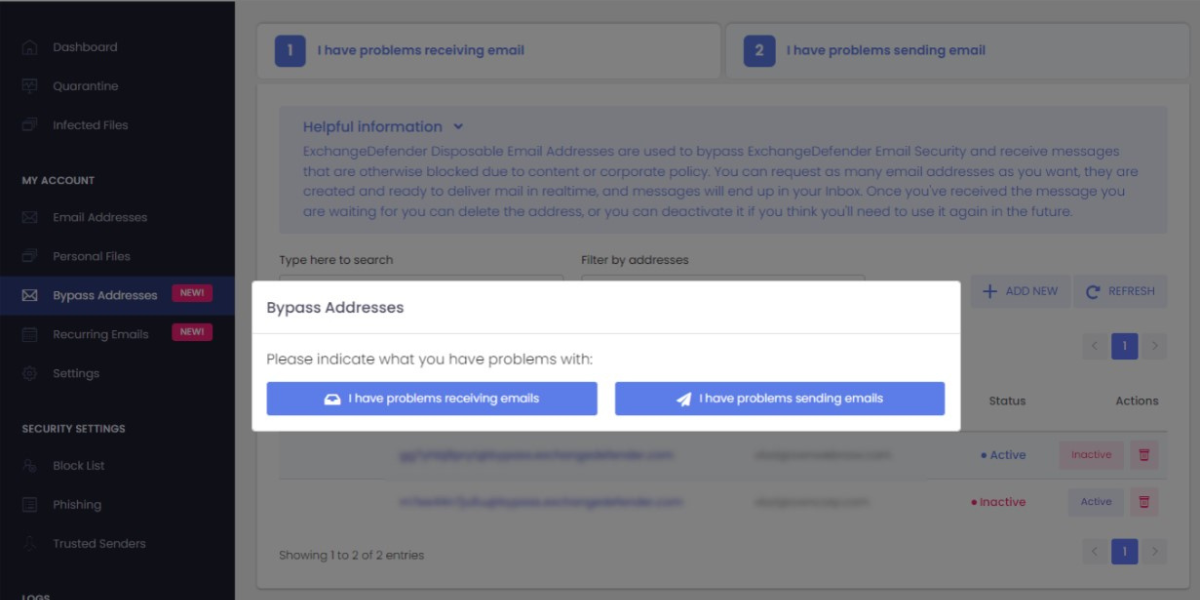
If none of this works, you have something that no other email provider
features – https://bypass.exchangedefender.com – try it today, helps with email
sending and receiving problems.
Troubleshooting Email Delivery with ExchangeDefender Logs

Modern email delivery has become complex in order to eliminate scams and minimize the impact of cyber threats. Unfortunately, those complexities can impact mail delivery: “I sent them an email and they never got it!!!”
First point the user to https://bypass.exchangedefender.com service that’s included with ExchangeDefender. Our users love it because they don’t have to wait on the tech issue to get sorted, they can send the mail right away (and it tends to have a far better delivery success rate because we strip everything that typically trips up SPAM and security filters).
Second, find the problem in the mail and error logs.
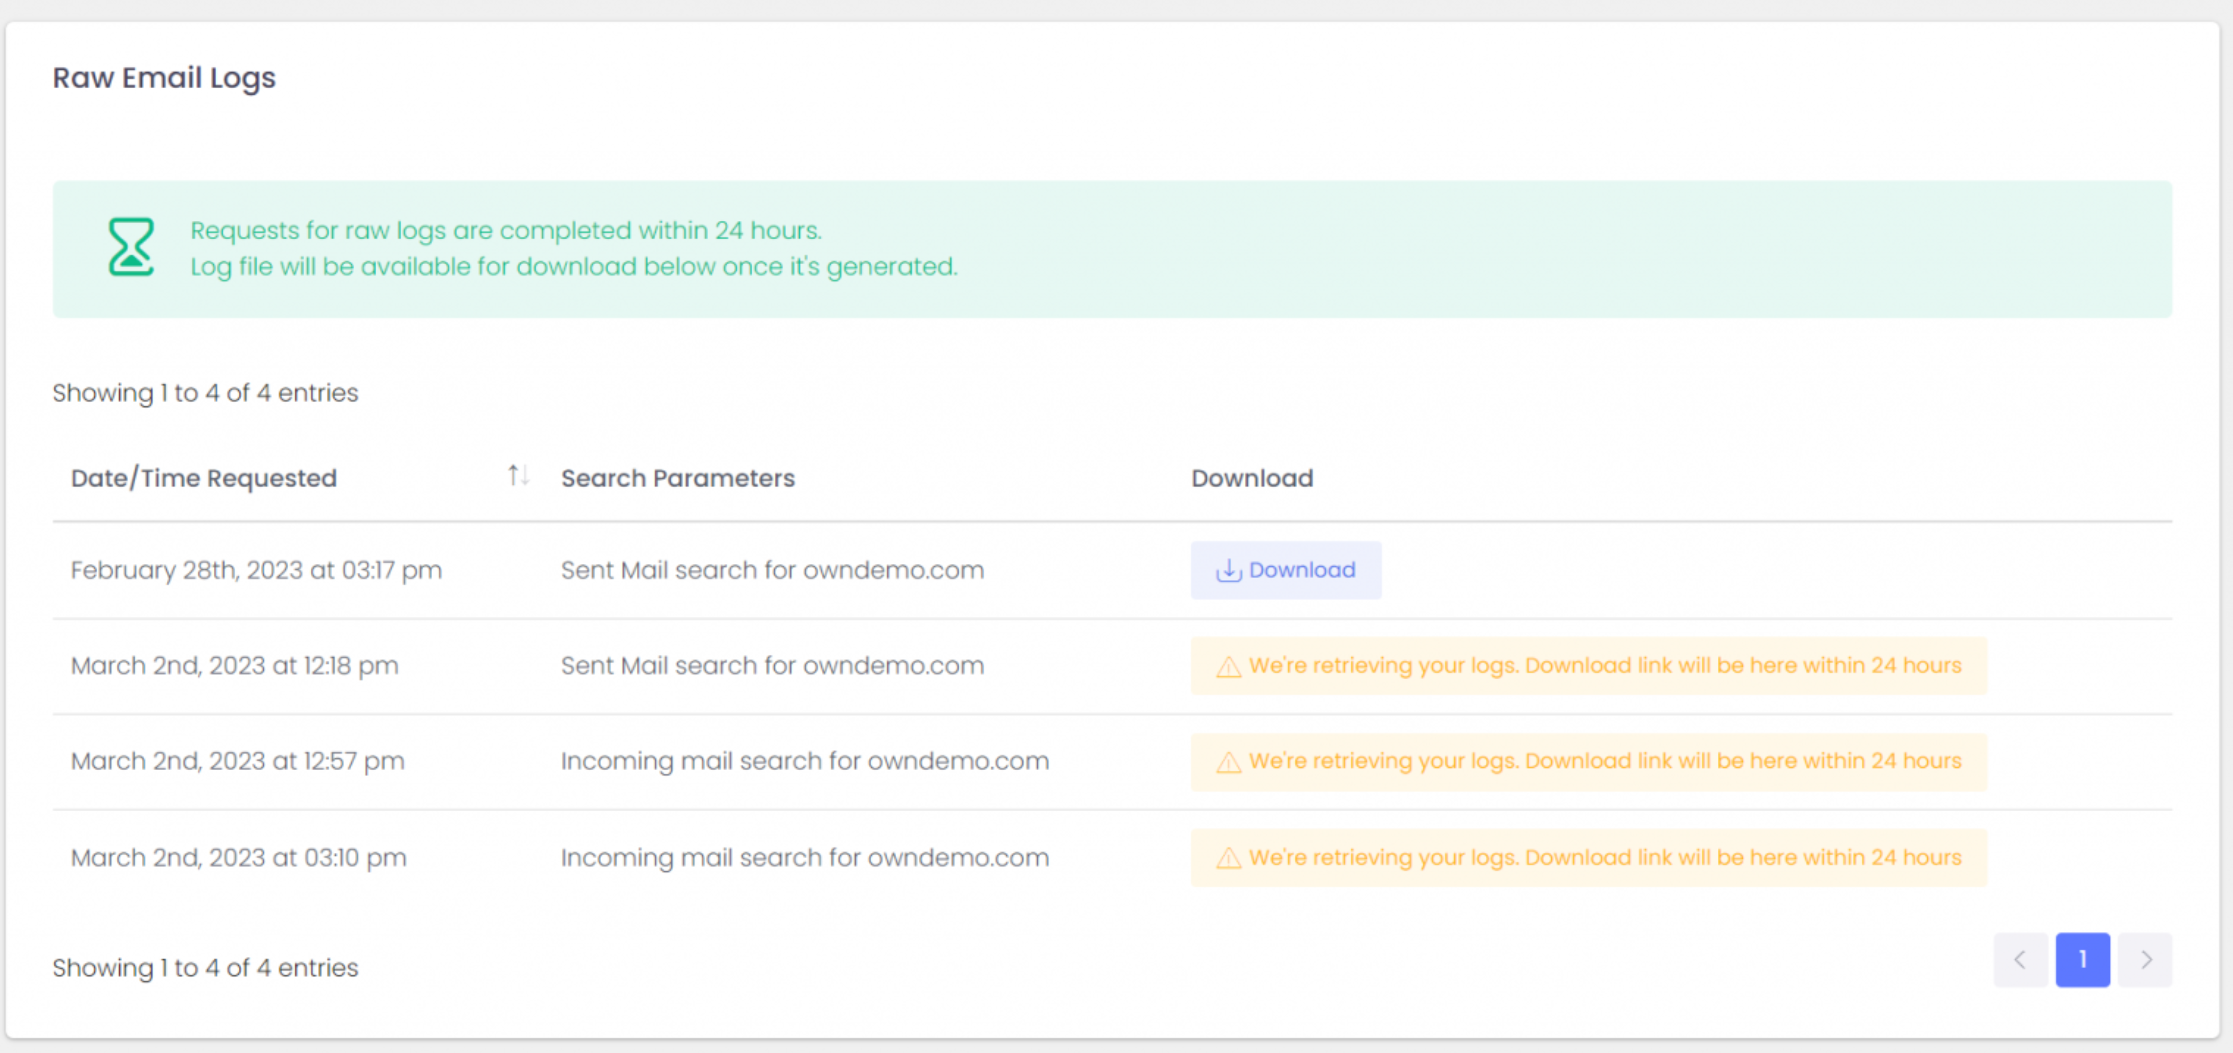
You can of course use our interactive mail log (tracing) search to locate the message and see where the problem may be. For larger tenants, we recommend downloading the logs so you can go through them faster on your PC:
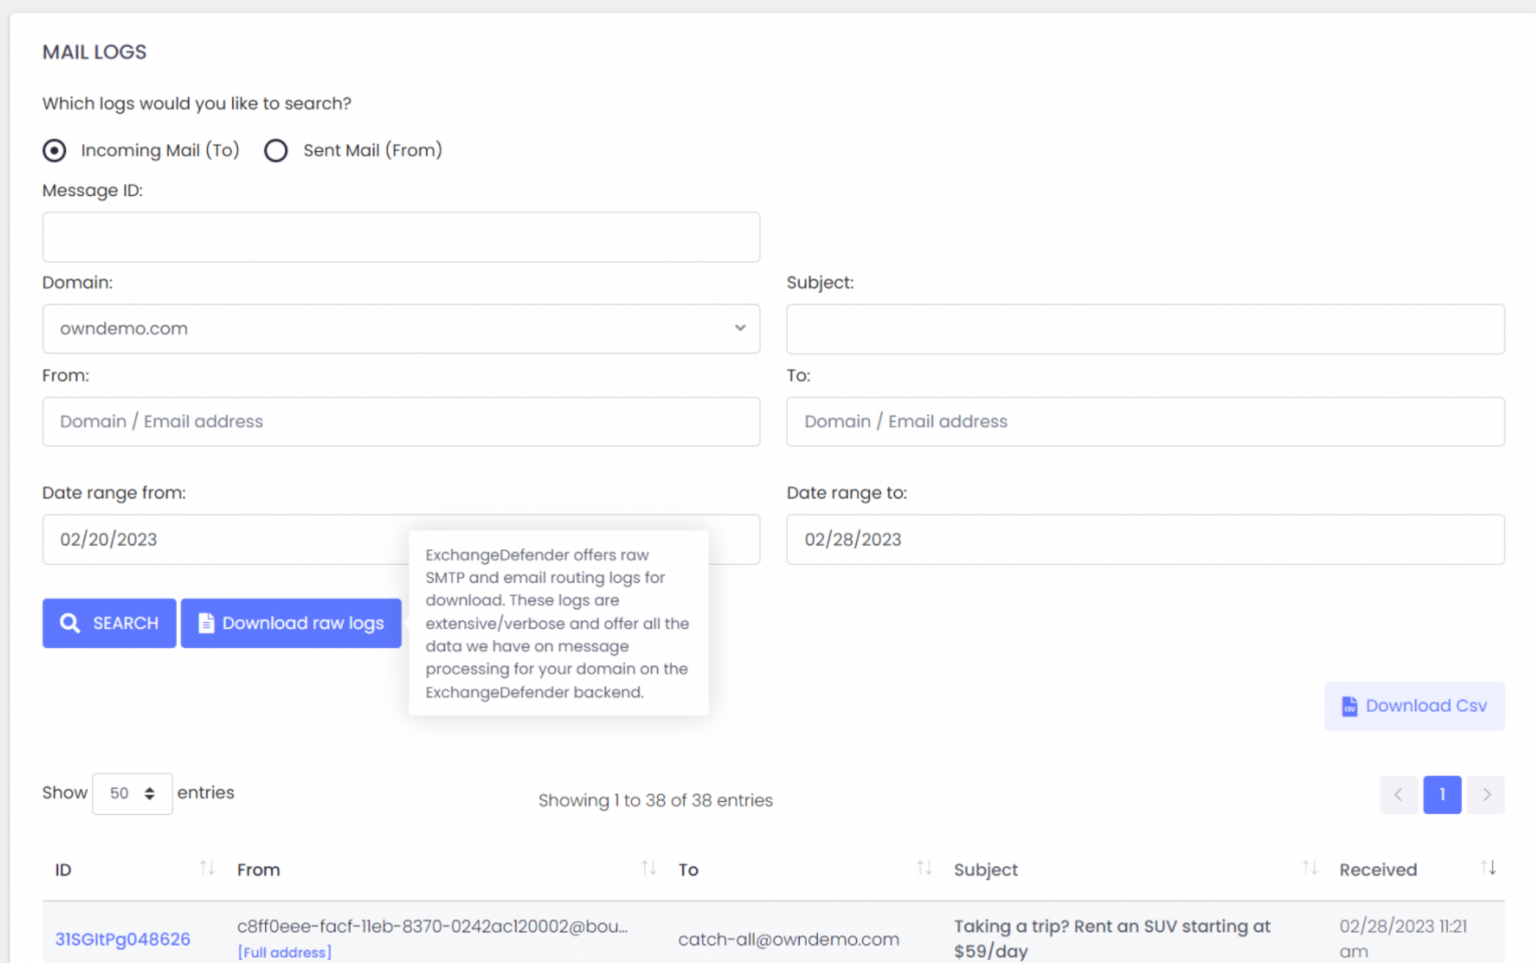
ExchangeDefender can help identify the issue through our detailed Raw SMTP logs and Mail Error logs
Log access gives you raw access to everything we have on our backend but you get it faster (as our support doesn’t have access to your data including logs, and getting the access approved internally takes time).
If log analytics isn’t your thing please contact us about the ExchangeDefender Managed Service where you’ll have your own postmaster managing all these issues for you (service must be enrolled before requesting support).
Email delivery problems can be complex and at times out of your control. This is why we always first recommend going to bypass.exchangedefender.com (and ExchangeDefender Inbox) so you can actually do your work. After that, grab the logs and see what the problem is. As always, we’re happy to help!
ExchangeDefender Phishing Firewall and Microsoft Defender
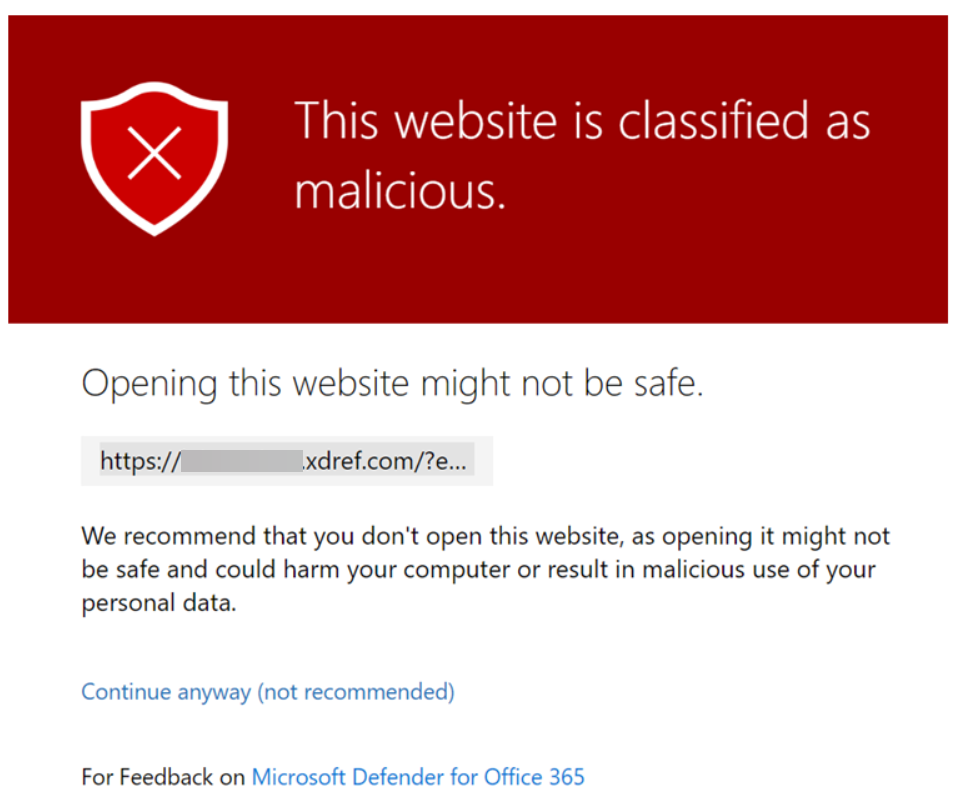
Now and then Microsoft Defender will encounter something potentially dangerous when it’s processing your browsing activity. Most of the time it is just the URL of a site they’ve blacklisted.
Enter ExchangeDefender Phishing Firewall. We rewrite every URL going through our service to give our users an extra layer of security and prevent malware and phishing. If you’ve seen the xdref.com links in your email, that’s US keeping you from accidentally clicking on a legitimate link and getting a zero-day exploit compromising your PC. Well, Microsoft Defender looks at the same link and its contents and can flag an entire URL of your phishing firewall. Then you end up seeing this:
How do I get this resolved?
Since this URL is exclusively used by you and your clients, make sure you’re using ExchangeDefender Outbound Service to route outbound mail (our outbound service strips all the xdref.com URLs).
Next, please report the problem with the URL to Microsoft at this location:
https://security.microsoft.com/reportsubmission?viewid=url
How do I fix it?
There are two ways to solve this problem within your tenant at Microsoft 365. The fastest way is with PowerShell:
New-TenantAllowBlockListItems -ListType Url -Allow -Entries ~xdref.com~ -NoExpiration
The more user-friendly way to allow the URL is through the Microsoft Defender Portal at the following URL (make sure you’re logged in first):
https://security.microsoft.com/tenantAllowBlockList
Microsoft tends to move its security components around a lot so if the URL changes login to the Microsoft 365 Defender Portal and go to: Policies & Rules> Threat Policies > Rules section > Tenant Allow/Block Lists.
To learn more about Microsoft Defender and how to manage its security policies on this topic please see the following KB article.
Tip: ExchangeDefender recommends executing this process when the client is onboarded, but it will work at any time.